
[ODOP] 98일차 - 인증 프로세스 구현 - 인증 추가 데이터 지정 및 구현
![[ODOP] 98일차 - 인증 프로세스 구현 - 인증 추가 데이터 지정 및 구현](/content/images/size/w1200/2023/09/odop-2.png)
사용자의 인증에 대해 실질적으로 필요한 데이터는 username, password 이다.
이 두개의 데이터는 UsernamePasswordAuthenticationFilter 로 처리 하게 된다
하지만 인증을 할 때 여러 목적으로 추가 데이터를 사용 할 때가 있다
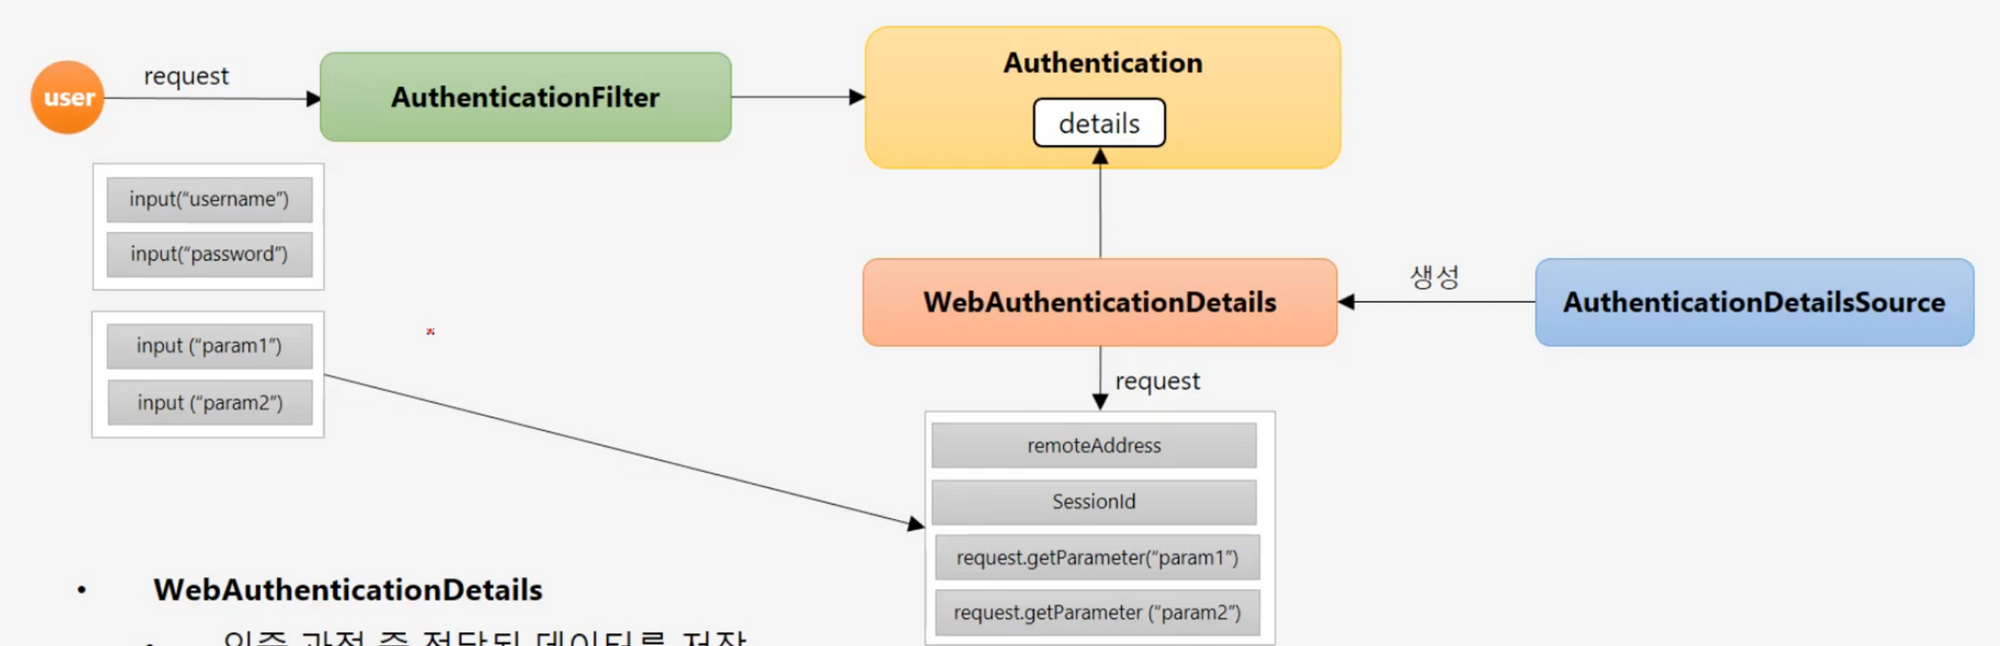
이 때 사용하는 것이 바로 WebAuthenticationDetails 와 AuthenticationDetailsSource 이다.
WebAuthenticationDetails
- 인증 과정 중 전달된 데이터를 저장
- Authentication 의 details 속성에 저장
AuthenticationDetailsSource
- WebAuthenticationDetails 객체를 생성
구현
추가 데이터를 사용하기위한 구현이므로 먼저 추가 데이터를 나타내는 클래스를 만들자
이를 나타내는 것은 WebAuthenticationDetails 이다. 먼저 해당 클래스를 상속하여 추가 데이터를 설정 해 주자
import lombok.Getter;
import org.springframework.security.web.authentication.WebAuthenticationDetails;

import javax.servlet.http.HttpServletRequest;

public class FormWebAuthenticationDetails extends WebAuthenticationDetails {

    @Getter
    private String secretKey;

    public FormWebAuthenticationDetails(HttpServletRequest request) {
        super(request);
        this.secretKey = request.getParameter("secret_key");
    }
}
이제 AuthenticationDetailsSource 인터페이스를 구현 하자
해당 인터페이스는 Security 에서 내부적으로 사용하고 있는 인터페이스로서 우리가 방금 만든 클래스를 매핑해주는 역할을 한다
import org.springframework.security.authentication.AuthenticationDetailsSource;
import org.springframework.security.web.authentication.WebAuthenticationDetails;
import org.springframework.stereotype.Component;

import javax.servlet.http.HttpServletRequest;

@Component
public class FormAuthenticationDetailsSource implements AuthenticationDetailsSource<HttpServletRequest, WebAuthenticationDetails> {

    @Override
    public WebAuthenticationDetails buildDetails(HttpServletRequest context) {
        return new FormWebAuthenticationDetails(context);
    }
}
흐름은 아래와 같습니다
-
사용자의 요청
-
Security 의 FilterChainProxy 에서 Filter 들을 순회하며 인증/인가 처리 한다.
-
Filter 들을 순회하다 AuthenticationFilter 가 동작하는 구간에 도달한다.
-
우리가 지정하게 될
authenticationDetailsSource(SecurityConfig 에서 설정. 조금 뒤 나온다.) 에서 연결된 AuthenticationDetailsSource 의 구현체를 확인한다.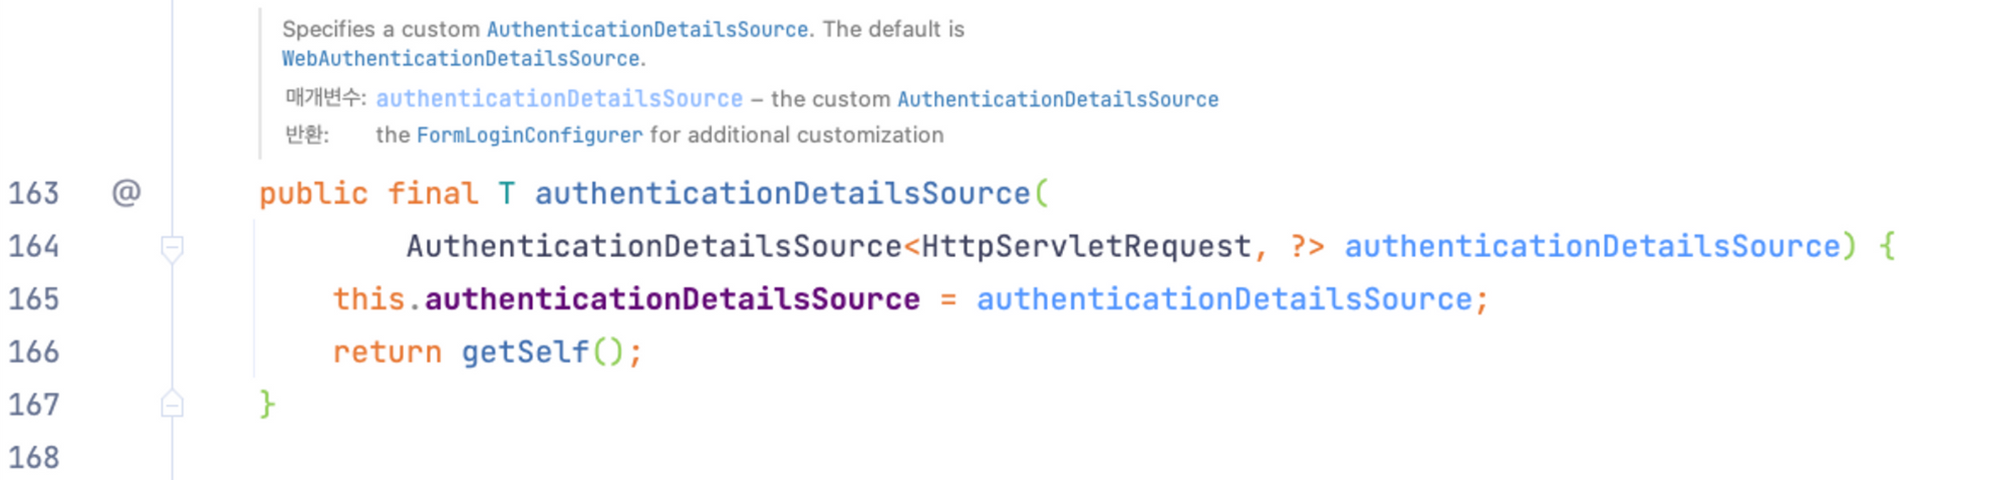
AbstractAuthenticationFilterConfigurer.java
-
구현체의 구현에 따라 우리가 구현한 FormWebAuthenticationDetails 에 매핑
이제 매핑하는 구간은 알았으니 해당 매핑에 대한 구현을 spring 에게 전달해야 한다
FormAuthenticationDetailsSource 를 Component 로 지정 해 주었기 때문에 아래와 같이 선언 해 줄 수 있다
import lombok.RequiredArgsConstructor;
import org.springframework.context.annotation.Configuration;
import org.springframework.security.authentication.AuthenticationDetailsSource;
import org.springframework.security.config.annotation.web.builders.HttpSecurity;
import org.springframework.security.config.annotation.web.configuration.EnableWebSecurity;
import org.springframework.security.config.annotation.web.configuration.WebSecurityConfigurerAdapter;

@Configuration
@EnableWebSecurity
@RequiredArgsConstructor
public class SecurityConfig extends WebSecurityConfigurerAdapter {

    private final AuthenticationDetailsSource formAuthenticationDetailsSource;

    @Override
    protected void configure(HttpSecurity http) throws Exception {
        http
                ...
            .and()
                .formLogin()
                .loginPage("/login")
                .loginProcessingUrl("/login_proc")
                .authenticationDetailsSource(formAuthenticationDetailsSource)
                .defaultSuccessUrl("/")
                .permitAll()
        ;
    }
}
.authenticationDetailsSource(formAuthenticationDetailsSource) 를 통해 구현체의 의존성을 주입 해 주는 코드이다.
이 코드 이전에 4번에서 조금 뒤 나온다는 부분이 해당 부분이다.
이제 실제 인증에서 사용 해 보자
package com.pollra.security.application.config.security.provider;

import com.pollra.security.application.config.security.common.FormWebAuthenticationDetails;
import com.pollra.security.application.config.security.service.AccountContext;
import org.springframework.beans.factory.annotation.Autowired;
import org.springframework.security.authentication.AuthenticationProvider;
import org.springframework.security.authentication.BadCredentialsException;
import org.springframework.security.authentication.InsufficientAuthenticationException;
import org.springframework.security.authentication.UsernamePasswordAuthenticationToken;
import org.springframework.security.core.Authentication;
import org.springframework.security.core.AuthenticationException;
import org.springframework.security.core.userdetails.UserDetailsService;
import org.springframework.security.crypto.password.PasswordEncoder;

public class CustomAuthenticationProvider implements AuthenticationProvider {

    @Autowired
    private PasswordEncoder passwordEncoder;

    @Autowired
    private UserDetailsService userDetailsService;

    @Override
    public Authentication authenticate(Authentication authentication) throws AuthenticationException {

        String username = authentication.getName();
        String password = (String) authentication.getCredentials();

        AccountContext accountContext = (AccountContext) userDetailsService.loadUserByUsername(username);

        if( ! passwordEncoder.matches(password, accountContext.getPassword())) {
            throw new BadCredentialsException("BadCredentialsException");
        }

        FormWebAuthenticationDetails details = ( FormWebAuthenticationDetails ) authentication.getDetails();
        String secretKey = details.getSecretKey();

        if(secretKey == null || !"secret".equals(secretKey)) {
            throw new InsufficientAuthenticationException("InsufficientAuthenticationException");
        }

        UsernamePasswordAuthenticationToken authenticationToken = new UsernamePasswordAuthenticationToken(accountContext.getAccount(), null, accountContext.getAuthorities());

        return authenticationToken;
    }

    @Override
    public boolean supports(Class<?> authentication) {
        return UsernamePasswordAuthenticationToken.class.isAssignableFrom(authentication);
    }
}
위 코드의 일부는 우리가 지금까지 만들었던 추가 데이터를 사용하는 구간이 포함되어있다.
FormWebAuthenticationDetails details = ( FormWebAuthenticationDetails ) authentication.getDetails();
String secretKey = details.getSecretKey();

if(secretKey == null || !"secret".equals(secretKey)) {
    throw new InsufficientAuthenticationException("InsufficientAuthenticationException");
}이렇게만 구현해주면 Security 는 우리가 만들어둔 클래스를 잘 활용하여 추가 데이터를 구성하고, 매핑까지 해준다.
![[ODOP] 101일차 - ApplicationService](/content/images/size/w960/2023/09/odop-5.png)
![[ODOP] 100일차 - ApplicationService 와 DomainService](/content/images/size/w960/2023/09/odop-4.png)
![[ODOP] 99일차 - Ajax 인증 - 흐름 및 개요](/content/images/size/w960/2023/09/odop-3.png)
![[ODOP] 97일차 - 로그아웃 처리 구현](/content/images/size/w960/2023/09/odop-1.png)