
[ODOP] 96일차 - DB 연동 인증 : CustomAuthenticationProvider
![[ODOP] 96일차 - DB 연동 인증 : CustomAuthenticationProvider](https://storage.ghost.io/c/83/15/8315084f-273b-4f5d-abf0-11706c161bc8/content/images/size/w1200/2023/09/odop.png)
사용자가 인증을 수행 할 때 핵심적인 역할을 하는 AuthenticationProvider 를 Custom 하는 방법을 알아보자
💡
Provider 가 동작하는 시점은 [ODOP] 87일차 - 인증 요청 흐름 에 잘 정리 해 두었으니, 동작 시점이 궁금하다면 참고 바란다.
해당 클래스 가 동작하는 시점에서의 인증 흐름은 다음과 같다 아래 내용은 spring-security-core-5.6.3 의 내용이다. 현재 버전과는 조금 다를 수 있다.
- UsernamePasswordAuthenticationFilter 에서 권한에 대한 인증 처리가 진행되기 전, 권한 인증에 필수적으로 필요한 username, password 등을 담아 Authentication 객체를 만든다.
- UsernamePasswordAuthenticationFilter 는 해당 인증 처리를 위해 ProviderManager 에게 그 흐름을 넘긴다.
- ProviderManager 는 구현되어있는 Provider 들을 가지고 for 문을 돌며 인증에 대한 처리를 수행
- 기본적으로 구현되어 있는 AnonymousAuthenticationProvider 가 가장 먼저 처리를 수행
- 이 때 AnonymousAuthenticationProvider 의 부모 Provider 를 탐색하게 되는데, 여기서 등장하는 것이 이 글에서 만들 CustomAuthenticationProvider 이다.
CustomAuthenticationProvider 의 구현
package com.pollra.security.application.config.security.provider;

import com.pollra.security.application.config.security.service.AccountContext;
import lombok.RequiredArgsConstructor;
import org.springframework.beans.factory.annotation.Autowired;
import org.springframework.security.authentication.AuthenticationProvider;
import org.springframework.security.authentication.BadCredentialsException;
import org.springframework.security.authentication.UsernamePasswordAuthenticationToken;
import org.springframework.security.core.Authentication;
import org.springframework.security.core.AuthenticationException;
import org.springframework.security.core.userdetails.UserDetailsService;
import org.springframework.security.crypto.password.PasswordEncoder;
import org.springframework.stereotype.Component;

public class CustomAuthenticationProvider implements AuthenticationProvider {

    @Autowired
    private PasswordEncoder passwordEncoder;

    @Autowired
    private UserDetailsService userDetailsService;

    @Override
    public Authentication authenticate(Authentication authentication) throws AuthenticationException {

        String username = authentication.getName();
        String password = (String) authentication.getCredentials();

        AccountContext accountContext = (AccountContext) userDetailsService.loadUserByUsername(username);

        if( ! passwordEncoder.matches(password, accountContext.getPassword())) {
            throw new BadCredentialsException("BadCredentialsException");
        }

        UsernamePasswordAuthenticationToken authenticationToken = new UsernamePasswordAuthenticationToken(accountContext.getAccount(), null, accountContext.getAuthorities());

        return authenticationToken;
    }

    @Override
    public boolean supports(Class<?> authentication) {
        return UsernamePasswordAuthenticationToken.class.isAssignableFrom(authentication);
    }
}
위 코드를 잘 보면 UsernamePasswordAuthenticationToken 이라는 객체를 볼 수 있다.
해당 클래스에는 생성자가 2개 있는데, 이들은 각각 사용되는 구간이 다르다.
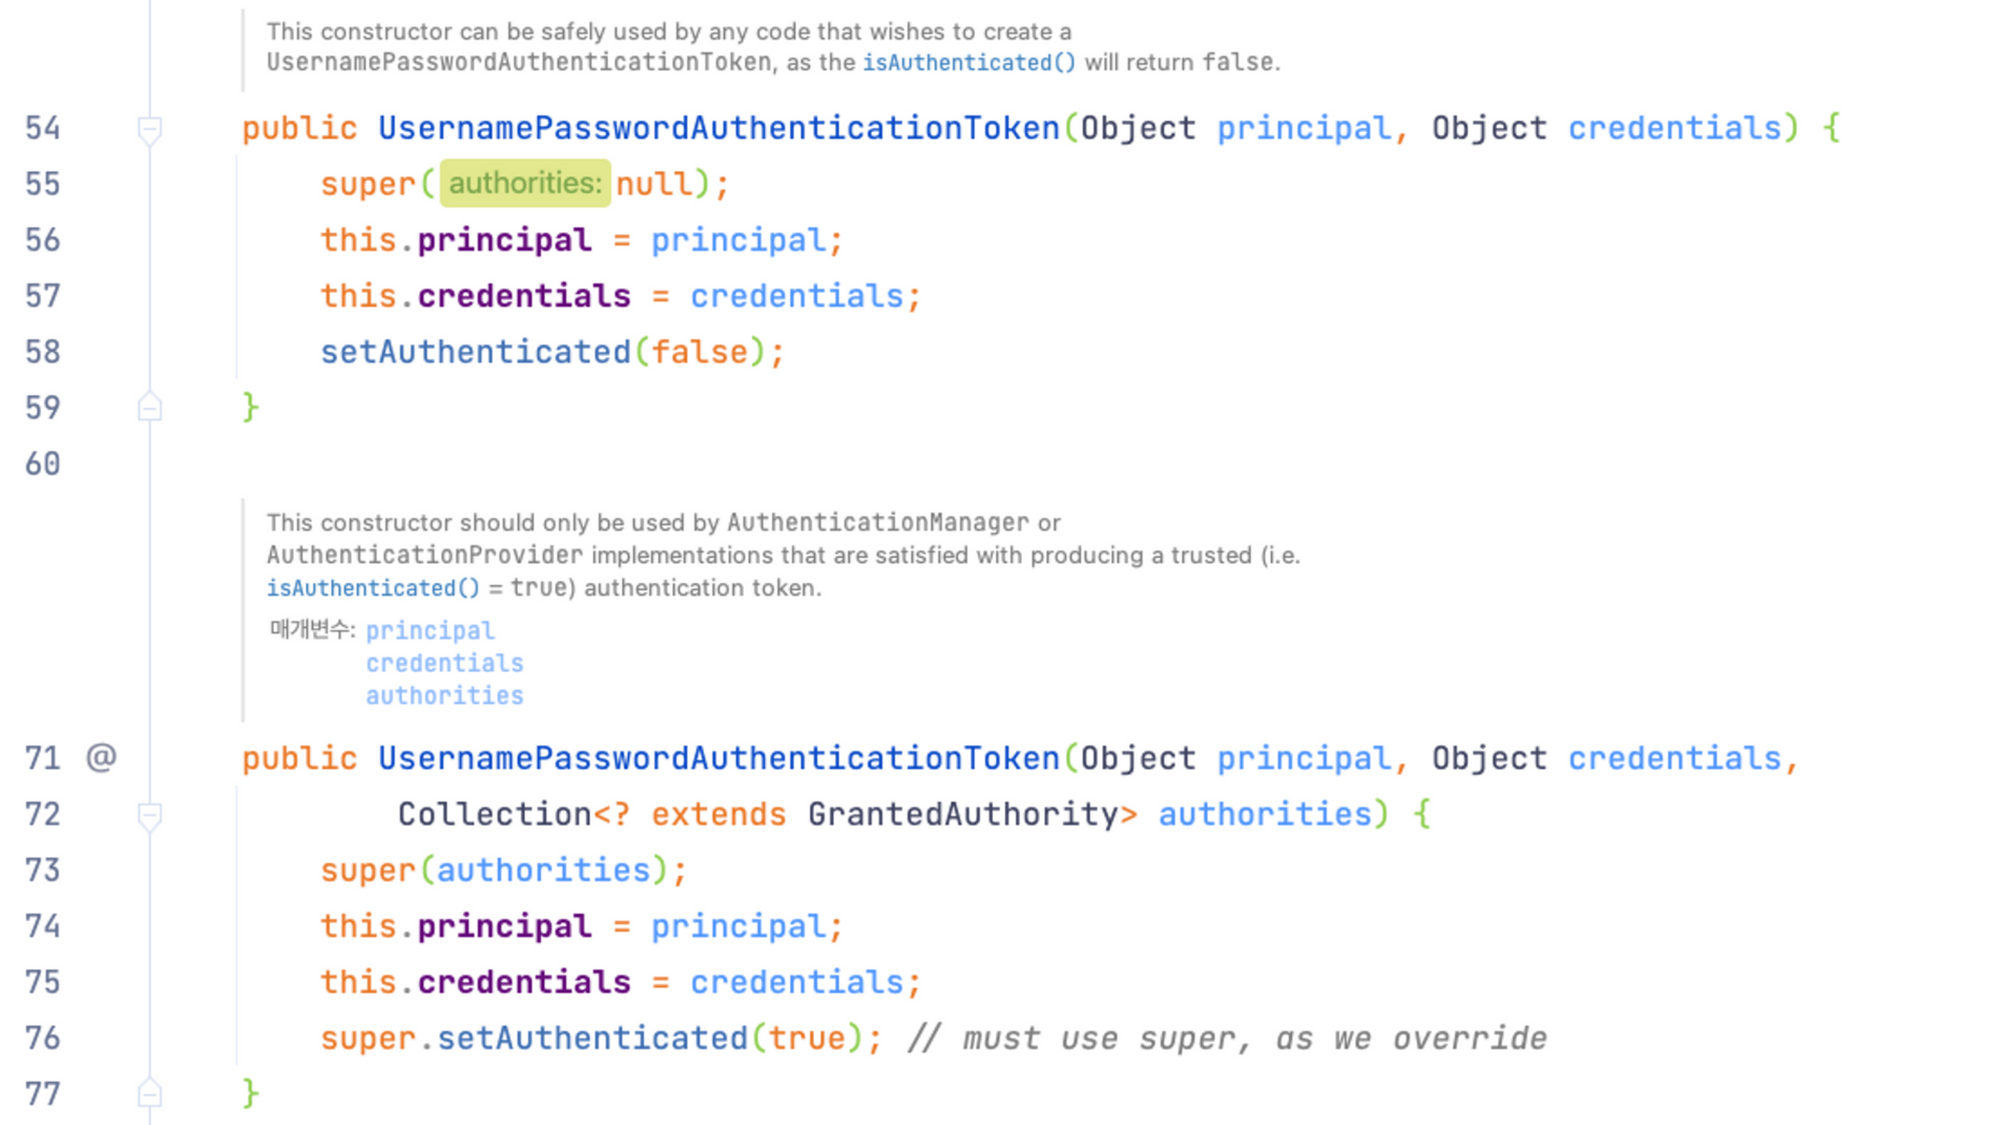
첫번째 생성자(line:54)에서는 super 에게 null 을 주고 super.authenticated 정보를 false 를 주고 있다
생성자에는 매개변수가 존재하는데, principal 은 계정 정보를. credentials 에는 비밀번호 정보를 준다.
- line:54) 인가 처리가 완료되기 전 SpringSecurity 에게 인가에 필요한 정보를 부여하기 위해 존재하는 것으로 확인된다.
- line:71) 인가 처리가 완료된 후 SpringSecurity 에게 인가 정보를 지정해주기 위해 존재하는 것으로 보인다.
따라서 CustomAuthenticationProvider 에서는 인증이 완료된 후에 사용될 목적으로 만들어진 2번째 생성자를 사용하여 리턴한다.
위에서 지정한 구현체(CustomAuthenticationProvider)를 security 설정에 추가
package com.pollra.security.application.config.security;
import com.pollra.security.application.config.security.provider.CustomAuthenticationProvider;
import com.pollra.security.application.config.security.service.CustomUserDetailsService;
import lombok.RequiredArgsConstructor;
import org.springframework.boot.autoconfigure.security.servlet.PathRequest;
import org.springframework.context.annotation.Bean;
import org.springframework.context.annotation.Configuration;
import org.springframework.security.authentication.AuthenticationProvider;
import org.springframework.security.config.annotation.authentication.builders.AuthenticationManagerBuilder;
import org.springframework.security.config.annotation.web.builders.HttpSecurity;
import org.springframework.security.config.annotation.web.builders.WebSecurity;
import org.springframework.security.config.annotation.web.configuration.EnableWebSecurity;
import org.springframework.security.config.annotation.web.configuration.WebSecurityConfigurerAdapter;
import org.springframework.security.core.userdetails.UserDetailsService;
import org.springframework.security.crypto.factory.PasswordEncoderFactories;
import org.springframework.security.crypto.password.PasswordEncoder;
@Configuration
@EnableWebSecurity
@RequiredArgsConstructor
public class SecurityConfig extends WebSecurityConfigurerAdapter {
@Override
protected void configure(AuthenticationManagerBuilder auth) throws Exception {
auth.authenticationProvider(customAuthenticationProvider());
}
@Bean
public AuthenticationProvider customAuthenticationProvider() {
return new CustomAuthenticationProvider();
}
...
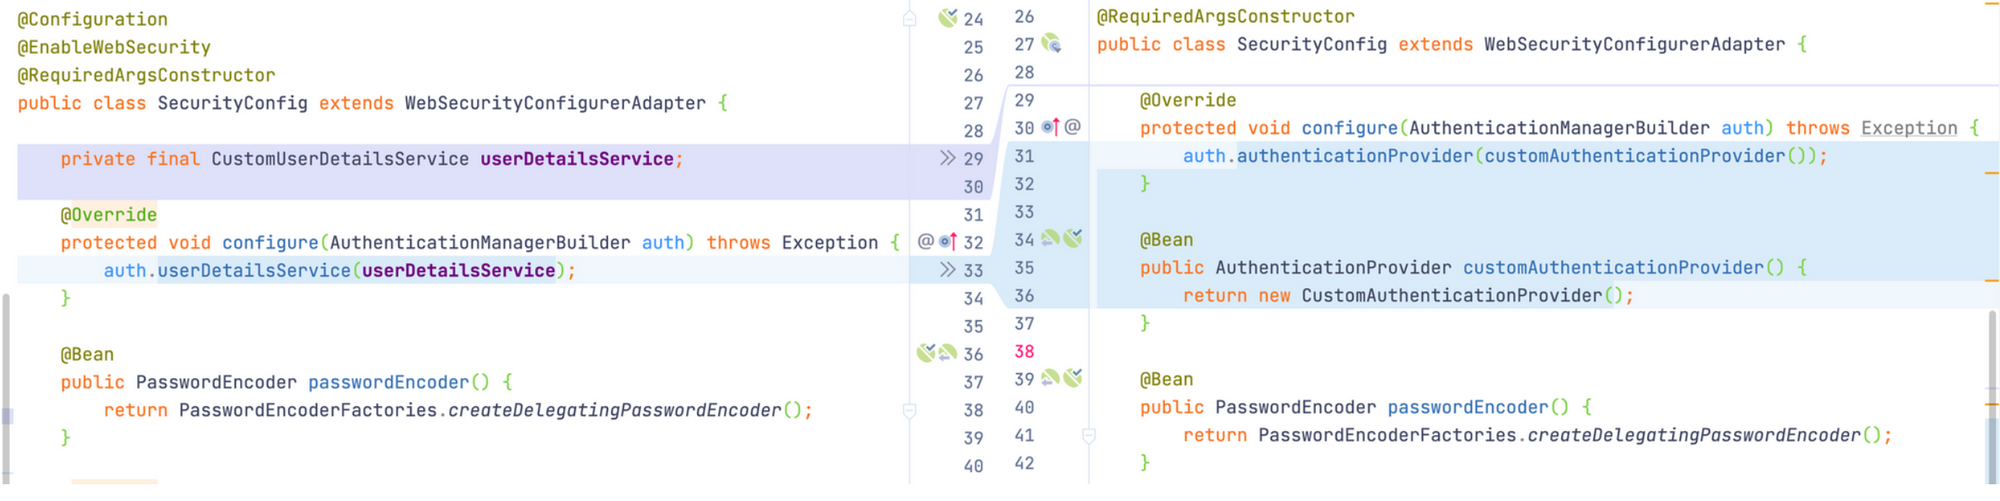
}아래는 이전 셋팅과 비교한 스크린샷
![[ODOP] 101일차 - ApplicationService](https://storage.ghost.io/c/83/15/8315084f-273b-4f5d-abf0-11706c161bc8/content/images/size/w960/2023/09/odop-5.png)
![[ODOP] 100일차 - ApplicationService 와 DomainService](https://storage.ghost.io/c/83/15/8315084f-273b-4f5d-abf0-11706c161bc8/content/images/size/w960/2023/09/odop-4.png)
![[ODOP] 99일차 - Ajax 인증 - 흐름 및 개요](https://storage.ghost.io/c/83/15/8315084f-273b-4f5d-abf0-11706c161bc8/content/images/size/w960/2023/09/odop-3.png)
![[ODOP] 98일차 - 인증 프로세스 구현 - 인증 추가 데이터 지정 및 구현](https://storage.ghost.io/c/83/15/8315084f-273b-4f5d-abf0-11706c161bc8/content/images/size/w960/2023/09/odop-2.png)